


Over 6.1 folds a bow 🎀
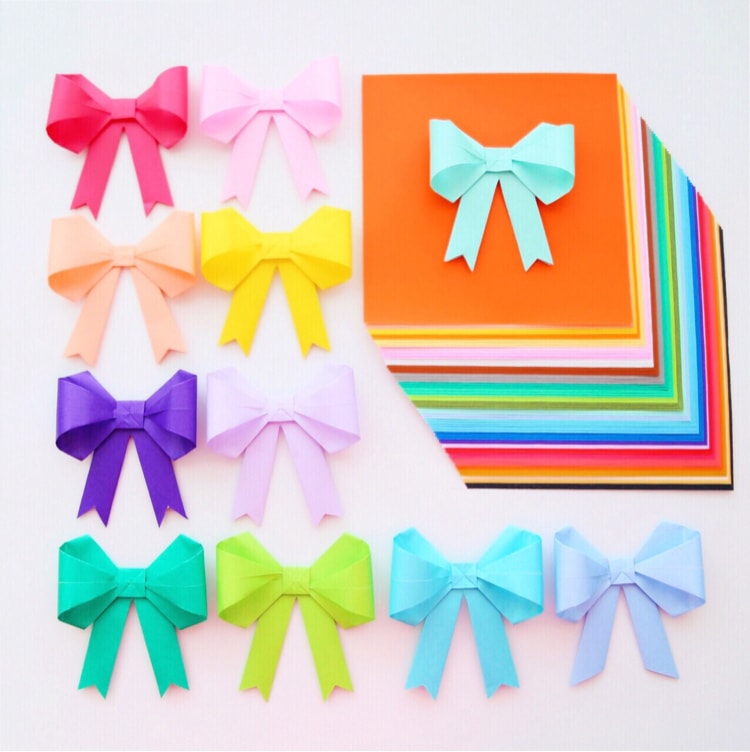
1 piece of origami + 1 pair of scissors + 1 pair of hands = 1 cute three-dimensional bow
I use MUJI origami, a pack of 80 sheets, 27 colors, and the price is $1.25
The bow is attached to the gift box to add a little fun, and it is also super beautiful to be attached to the refrigerator and the wall 🌈
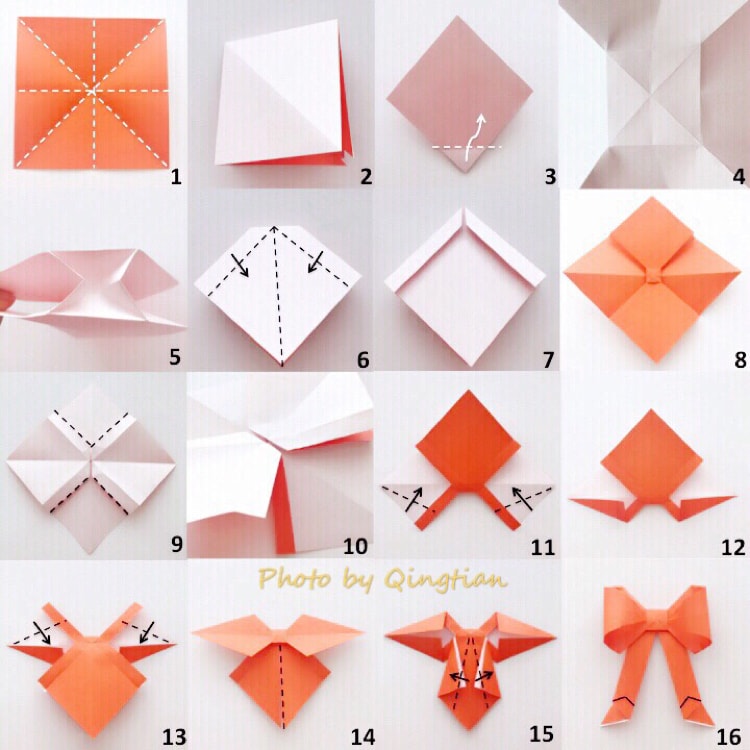
I need a square origami. For the convenience of description, I chose one with different colors on the front and back. Orange on the front, white on the back.
Step 1: Fold the paper in half along the horizontal, vertical and diagonal lines (4 dotted lines in total).
Step 2: Harvest a small square.
Step 3: Fold a triangle in the direction of the dotted line and the arrow.
Step 4: Spread out the whole sheet of paper, there are those folds in the small picture 4.
Step 5: Follow the shape of the fold and fold inward.
Step 6: The small square in the original Step 2 has become the shape of the small picture 6. Fold in the direction of the dotted line and arrow.
Step 7: Fold the front and back a total of 4 times to get the small picture 7.
Step 8: Gently spread the paper flat and get the small picture 8.
Step 9: According to the four dotted lines in the small picture 9, use a knife to cut.
Step 10: Get the cut-out in the small picture 10.
Step 11 -13: Fold in half according to the dotted line and the direction of the arrow, and get bow ears when folded.
Step 14: Cut the front of the bow with scissors according to the dotted line.
Step 15: On the back of the bow, fold the lower ribbon part in half according to the dotted line and the direction of the arrow.
Step 16: Go back to the front of the bow, bend the ears on both sides, and tuck the pointed parts into the center of the bow to fix it. Below the ribbon part, cut out the shape with scissors according to the black line
 Show Original
 过6.1折朵蝴蝶结🎀
1张折纸 + 1把剪刀 + 1双手 = 1朵可爱的立体蝴蝶结
用的是MUJI折纸,一包80张,27色,价格$1.25
蝴蝶结贴在礼盒上增添点乐趣 贴冰箱上和墙上也超级漂亮🌈
需要一张正方形折纸,为了方便描述,我选了一张正反面颜色不一样的。正面橘色,反面白色。
Step 1: 按横、竖、两对角线(共4条虚线)对折纸张。
Step 2: 收成一个小正方形。
Step 3: 按虚线和箭头方向折一个三角形。
Step 4: 把整张纸平摊开,小图4里面有那些折横。
Step 5: 顺着折横的形状,往里凹折进去。
Step 6: 原本Step 2里的小正方形就变成了小图6那样的形状。按照虚线和箭头方向折过去。
Step 7: 正面背面一共折4下,得到了小图7。
Step 8: 把纸轻轻平摊开,得到了小图8。
Step 9: 按照小图9里四条虚线,用小刀划开。
Step 10: 得到了小图10里面划开的样子。
Step 11 -13: 按照虚线和箭头方向对折,折时候得到蝴蝶结耳朵了。
Step 14: 蝴蝶结正面,按照虚线用剪刀剪开。
Step 15: 蝴蝶结背面,下面丝带部分,按照虚线和箭头方向对折。
Step 16: 回到蝴蝶结正面,两边耳朵弯进来,尖尖的地方塞进蝴蝶结中心就可以固定了。下面丝带部分,按照黑线用剪刀剪出形状
过6.1折朵蝴蝶结🎀
1张折纸 + 1把剪刀 + 1双手 = 1朵可爱的立体蝴蝶结
用的是MUJI折纸,一包80张,27色,价格$1.25
蝴蝶结贴在礼盒上增添点乐趣 贴冰箱上和墙上也超级漂亮🌈
需要一张正方形折纸,为了方便描述,我选了一张正反面颜色不一样的。正面橘色,反面白色。
Step 1: 按横、竖、两对角线(共4条虚线)对折纸张。
Step 2: 收成一个小正方形。
Step 3: 按虚线和箭头方向折一个三角形。
Step 4: 把整张纸平摊开,小图4里面有那些折横。
Step 5: 顺着折横的形状,往里凹折进去。
Step 6: 原本Step 2里的小正方形就变成了小图6那样的形状。按照虚线和箭头方向折过去。
Step 7: 正面背面一共折4下,得到了小图7。
Step 8: 把纸轻轻平摊开,得到了小图8。
Step 9: 按照小图9里四条虚线,用小刀划开。
Step 10: 得到了小图10里面划开的样子。
Step 11 -13: 按照虚线和箭头方向对折,折时候得到蝴蝶结耳朵了。
Step 14: 蝴蝶结正面,按照虚线用剪刀剪开。
Step 15: 蝴蝶结背面,下面丝带部分,按照虚线和箭头方向对折。
Step 16: 回到蝴蝶结正面,两边耳朵弯进来,尖尖的地方塞进蝴蝶结中心就可以固定了。下面丝带部分,按照黑线用剪刀剪出形状